Garlic Planting Tips for Beginners Grow Healthy Bulbs with Confidence
Garlic is one of the most forgiving crops a beginner can grow. Plant a few cloves in autumn, give them loose soil and steady care, and by next summer you can pull full bulbs from a small patch of ground. The process feels almost too simple, but a few early choices make a big difference.
Healthy garlic starts before the first clove goes into the soil. Timing, spacing, variety, and soil preparation all shape the size and flavour of the harvest. Once those basics are in place, garlic needs less attention than many garden crops.
Choose the best time to plant garlic
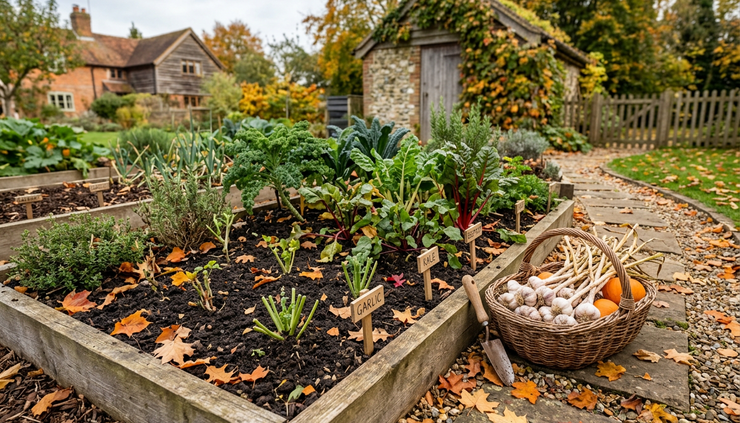
In most parts of Canada, garlic grows best when planted in the fall. The goal is to plant cloves after the hottest weather has passed but before the ground freezes solid. This gives the cloves enough time to grow roots, while keeping top growth modest before winter.
A good rule is to plant garlic about 4 to 6 weeks before the ground usually freezes in your area. For many Canadian gardeners, that means:
Late September to mid-October in colder regions
Mid-October to early November in milder areas
A little later in coastal or sheltered gardens where the soil stays workable
Fall planting leads to larger bulbs because garlic needs a cold period to form properly. The cloves settle in over winter, then send up strong green shoots as soon as the soil warms in spring.
Spring planting can still work if you missed the autumn window. Plant as early as the soil can be worked. Spring-planted garlic often forms smaller bulbs, but it is still useful, especially if grown for green garlic or tender young leaves.
Watch the soil, not just the calendar
Calendar dates help, but soil conditions matter more. Garlic should go into cool, workable soil. If the ground is soggy or frozen, wait. If it is warm enough that cloves may sprout quickly and push up several centimetres of leafy growth before winter, planting may be too early.
A little green growth in fall is not a disaster. Garlic is hardy. Still, the real prize is root growth underground, not leafy growth above it.
Prepare soil that helps bulbs size up
Garlic does not need fancy treatment, but it does need the right foundation. The best soil for garlic is loose, fertile, and well drained. Heavy, compacted clay can lead to small or misshapen bulbs, while soggy soil may cause cloves to rot.
Aim for soil that crumbles easily in your hand. Garlic roots grow shallow compared with some crops, so the top layer of soil should be easy for them to explore.
Good garlic soil has these qualities:
Good drainage
Water should move through the bed instead of pooling around the cloves.
Plenty of organic matter
Finished compost improves texture and adds slow, steady nutrients.
A neutral to slightly acidic pH
Garlic generally does well in the same soil range as most vegetables.
Low weed pressure
Garlic leaves are narrow, so the plants do not shade out weeds well.
Before planting, loosen the soil to a depth of about 20 to 25 cm. Mix in finished compost, leaf mould, or well-rotted manure. Avoid fresh manure, which can be too strong and may encourage soft growth or disease problems.
If your soil stays wet in spring, grow garlic in raised beds or mounded rows. Even a slight lift helps bulbs stay drier during thaw cycles and spring rains.
Do not overfeed at planting time
Garlic likes fertile soil, but too much nitrogen in fall can push leafy growth when the plant should be rooting. Compost is usually enough at planting. Save stronger feeding for spring, when the plants are actively growing.

Pick the right garlic variety for your garden
Garlic is not all the same. The two main types are hardneck garlic and softneck garlic, and each has its own strengths.
Hardneck garlic performs especially well in cold climates. It sends up a firm central stalk called a scape, which curls in early summer. The bulbs usually have fewer cloves, but the cloves are large and easy to peel. Many hardneck varieties have bold flavour.
Softneck garlic is common in grocery stores because it stores well and often produces more cloves per bulb. It usually does not produce a true scape. Softneck types grow best in milder regions, though some gardeners succeed with them in protected or warmer sites.
Garlic type | Best features | Good to know |
Hardneck | Cold hardy, large cloves, strong flavour, produces edible scapes | Often stores for a shorter time than softneck types |
Softneck | Long storage life, many cloves, good for braiding | Better suited to milder winters |
Rocambole | Rich flavour, easy to peel, popular with cooks | Needs cold winters and careful storage |
Porcelain | Very large cloves, strong plants, good cold tolerance | Fewer cloves per bulb, often 4 to 6 |
Purple Stripe | Attractive striped wrappers, complex flavour | Often performs well in cool climates |
Artichoke | Productive softneck type, many cloves | Can have small inner cloves |
For beginners in cold Canadian regions, hardneck garlic is usually the safest starting point. Porcelain, Rocambole, and Purple Stripe types are common choices. If you garden in a milder coastal area, softneck varieties may be worth trying as well.
Buy seed garlic from a garden centre, farm, or seed supplier when possible. Grocery store garlic may be treated to prevent sprouting, and it may not suit your local growing conditions. Choose firm bulbs with no mould, soft spots, or damage.
Plant cloves with the right depth and spacing
Good spacing gives each garlic plant enough room to form a full bulb. Crowded garlic can still grow, but the bulbs often stay small.
Separate garlic bulbs into individual cloves just before planting. Keep the papery skin on each clove. Choose the largest cloves for planting, because big cloves usually produce bigger bulbs. Save the tiny inner cloves for cooking.
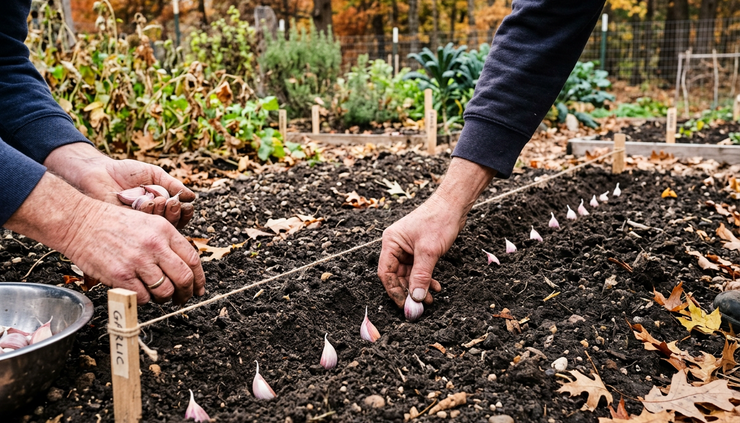
Follow these planting steps:
Prepare the bed
Remove weeds, loosen the soil, and mix in compost. Rake the surface level.
Break bulbs into cloves
Separate each bulb carefully. Do not peel the cloves.
Sort the cloves
Plant the biggest, firmest cloves. Discard any that feel soft or show mould.
Place each clove point up
The pointed end should face upward. The flatter root end goes down.
Plant at the right depth
Set cloves about 5 to 8 cm deep, measured from the top of the clove to the soil surface. In very cold areas, plant closer to the deeper end.
Space the cloves well
Leave 10 to 15 cm between cloves. Space rows about 20 to 30 cm apart. This gives bulbs room to grow and leaves enough space for weeding.
Cover and firm the soil
Gently cover the cloves and press the soil so there are no large air pockets.
Water after planting
Give the bed a good watering if the soil is dry. Moisture helps root growth begin.
Add mulch
Cover the bed with 8 to 12 cm of straw, shredded leaves, or another loose organic mulch. Mulch protects cloves from freeze-thaw cycles and helps control weeds.
The most common beginner mistake is planting garlic too close together. Wider spacing feels generous in fall, but it pays off when bulbs start swelling in summer.
If you grow in containers, choose a pot at least 25 to 30 cm deep with drainage holes. Use a high-quality potting mix, not dense garden soil. Containers freeze harder than garden beds, so move them to a sheltered spot for winter in colder areas.
Care for garlic through the growing season
Garlic care changes with the seasons. Once the cloves are planted, most of the work happens in spring and early summer.
Late fall and winter
After planting, the cloves begin to root. In cold areas, mulch keeps the soil temperature more stable. If wind blows mulch away, replace it before deep winter arrives.
Do not worry if shoots appear before the snow. Garlic can handle cold weather. The leaves may look rough after winter, but the plants usually recover when spring growth begins.
Spring
As soon as the soil starts warming, garlic pushes up green shoots. Pull mulch back slightly if it is packed down and blocking growth. Leave some mulch in place to hold moisture and suppress weeds.
Spring is when garlic benefits most from nutrients. Side-dress with compost or use a balanced organic vegetable fertilizer according to the package directions. Avoid heavy feeding once bulbs begin to form, because late nitrogen can delay maturity.
Keep the bed weeded. Garlic does not compete well with fast-growing weeds, especially in spring. Hand-pull weeds when they are small to avoid disturbing the garlic roots.
Watering
Garlic likes steady moisture while leaves are growing and bulbs are sizing up. Aim for about 2.5 cm of water per week, including rain, during active growth. Water deeply rather than sprinkling lightly every day.
Stop watering when the lower leaves begin to yellow and the bulbs are close to harvest. Drier soil helps the outer wrappers firm up and improves storage quality.
Scapes
Hardneck garlic produces scapes in early summer. These curly flower stalks are edible and have a mild garlic taste. Cut or snap them off when they make one or two curls.
Removing scapes helps the plant send more energy into the bulb. Use scapes in stir-fries, pesto, soups, eggs, or grilled vegetable dishes.
Pests and diseases
Garlic is fairly low-maintenance, but problems can happen. Start with clean seed garlic and rotate your crops. Avoid planting garlic where onions, leeks, shallots, or garlic grew recently.
Watch for:
Yellowing plants that appear weak early in the season
Soft or rotten bulbs
White mould near the base of the plant
Stunted plants in wet or compacted soil
Good drainage, crop rotation, and healthy planting stock prevent many issues. If a plant looks diseased, remove it and do not compost it.
Harvest, cure, and store your garlic
Garlic is usually ready to harvest in mid to late summer, depending on your region, variety, and planting date. The key is to watch the leaves.
Harvest when the lower leaves have turned brown but several upper leaves are still green. Each green leaf roughly connects to a wrapper layer around the bulb. If you wait until all the leaves are brown, the bulbs may split and store poorly.
Use a garden fork to loosen the soil before pulling. Do not yank the stems from hard ground, because they can break away from the bulbs.
After harvest, cure garlic in a dry, shaded, airy place for about two to three weeks. Lay bulbs in a single layer or hang them in bundles. Keep them out of direct sun, which can damage the cloves.
Once cured, trim roots and cut stems, unless you are braiding softneck garlic. Brush off loose dirt, but do not wash the bulbs before storage. Store garlic in a cool, dry, well-ventilated place.
Save your biggest, healthiest bulbs for planting again in fall. This is one of the joys of growing garlic. Over time, you can build a strain that suits your garden.

Growing garlic does not require a large garden, expensive tools, or years of experience. Start with good seed garlic, plant in cool fall weather, give each clove enough space, and keep the bed weeded and watered in spring. Those simple habits can turn a handful of cloves into a basket of homegrown bulbs.
The best next step is small and practical: choose one or two varieties, prepare a sunny bed, and plant a modest row this fall. By next summer, you will understand why so many gardeners make garlic a yearly tradition.


Comments