Garden Edging Ideas: Wood, Stone, or Metal for Beauty, Weed Control, and Easy Installation
A garden can be full of healthy plants and still look unfinished if the edges are messy. Grass creeps into beds. Mulch spills onto paths. Soil washes out after a hard rain. The line between lawn, path, and planting area starts to blur.
Garden edging fixes that problem with one simple move: it gives every part of the garden a clear boundary.
Good edging does more than tidy things up. It helps control weeds, keeps mulch where it belongs, protects plant roots from lawn tools, and gives the whole yard a more intentional look. Whether the garden is a relaxed cottage border, a modern front walk, or a practical vegetable patch, the right edging can make the space easier to maintain and much more attractive.

Why garden edging matters more than it seems
Garden edging is often treated as a finishing touch, but it works more like garden infrastructure. It shapes how the space looks, how it drains, and how much maintenance it needs over time.
A clean edge creates visual order. Even a casual garden looks more polished when beds have defined borders. Curved lines can soften a space, while straight lines can make it feel crisp and modern.
Edging also helps with weed and grass control. Lawn grass spreads through runners and roots. Without a barrier, it can move into garden beds quickly, especially in spring and early summer. A well-installed edge slows that spread and makes stray growth easier to spot and remove.
It also keeps materials in place. Mulch, gravel, compost, and soil tend to shift. Wind, rain, foot traffic, pets, and lawn mowing all push loose materials out of garden beds. Edging acts like a low retaining wall, keeping the bed surface neat.
There is a practical safety benefit too. Defined borders show where paths begin, where beds end, and where the mower should stop. This can reduce accidental damage to plants, irrigation lines, and young shrubs.
The best part is that edging can match almost any budget or style. A simple spade-cut edge costs very little. A stone or metal edge can last for many years. Wood can bring warmth to vegetable beds and natural gardens. The right choice depends on how the garden is used, how formal it should feel, and how much upkeep feels reasonable.
The best garden edging materials for different spaces
Wood, stone, and metal are three of the most popular edging materials, and each has a distinct personality. None is right for every garden. The best option is the one that suits the site, the plants, and the amount of maintenance the space can handle.
Wood edging feels warm and natural
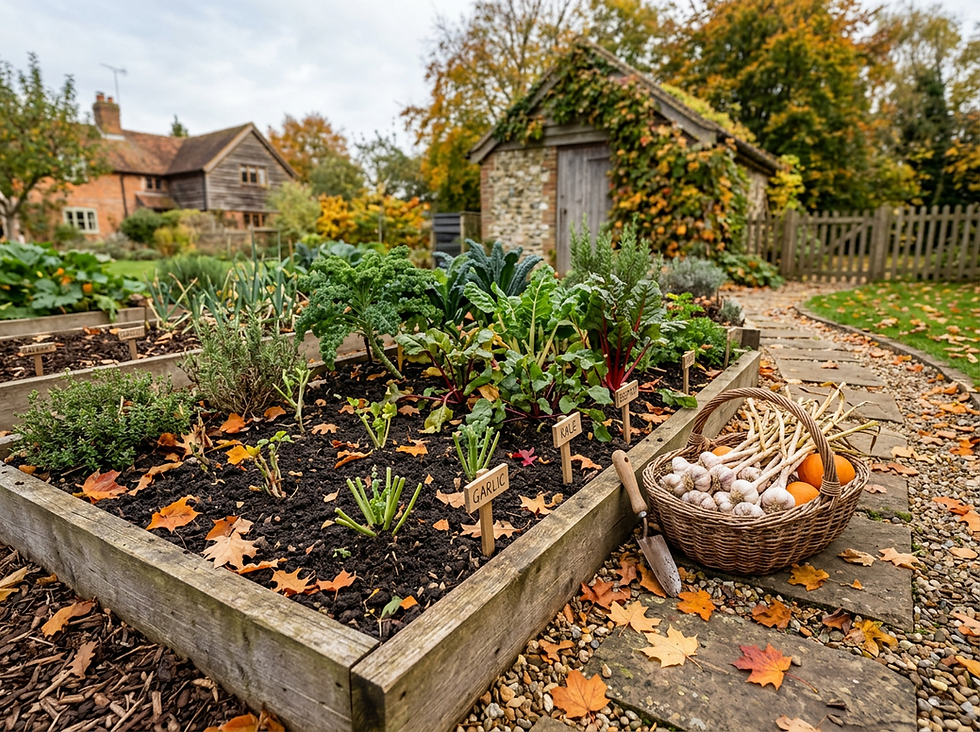
Wood edging works well in relaxed gardens, raised beds, vegetable patches, and rustic spaces. It blends easily with soil, mulch, herbs, and edible plants. Cedar is a common choice in Canada because it resists decay better than many softwoods, though all wood will weather over time.
Wood can be used as:
Short log rolls around informal beds
Timber boards for raised vegetable beds
Sleepers for bold rustic borders
Small stakes for cottage-style flower beds
Wood is usually easy to cut and install. It is also forgiving on uneven ground. That makes it a good choice for do-it-yourself projects.
The trade-off is longevity. Wood is organic, so it breaks down. It may need replacement sooner than stone or metal, especially in damp soil or shaded areas. Avoid using treated wood in edible garden beds unless the product is clearly rated as safe for that use.
Best fit
Wood suits gardens that feel natural, relaxed, or practical. It is especially useful for vegetable beds, herb gardens, family yards, and informal perennial borders.
Stone edging brings weight and character
Stone edging can look traditional, rugged, elegant, or casual, depending on the stone and how it is laid. Fieldstone creates a loose, natural look. Cut stone feels more formal. Flagstone can work beautifully beside paths and patios.
Stone has a few strong advantages. It is durable, heavy, and naturally attractive. It can handle Canadian freeze-thaw cycles better when installed on a stable base with good drainage. It also works well for slightly raised beds and slopes where loose soil needs support.
Stone can be more labour-intensive to install. Irregular stones need fitting and levelling. Heavy pieces may require more than one person to move safely. Still, the result can last for years with little care.
Best fit
Stone suits cottage gardens, woodland gardens, front beds, traditional homes, and larger planting areas where a permanent edge makes sense.
Metal edging makes clean lines easy
Metal edging is popular in modern, minimalist, and contemporary gardens. It creates a thin, crisp line that almost disappears visually while still doing a strong job underground.
Common options include steel and aluminum. Steel is strong and can develop a weathered look if it is designed to rust. Aluminum is lighter and resists corrosion. Both can create smooth curves or straight geometric lines, depending on the product.
Metal edging is especially useful where the goal is a sharp division between lawn and gravel, lawn and mulch, or path and planting bed. Since it is thin, it does not take up much space. That makes it useful in small yards and narrow side gardens.
The main challenge is installation accuracy. Metal edging shows wavy lines if the layout is rushed. It also needs proper anchoring so it stays in place through frost movement, mowing, and foot traffic.
Best fit
Metal suits modern homes, formal gardens, gravel paths, small urban yards, and spaces where a low-profile edge is preferred.

Material | Where it works best | Main advantage | What to watch |
Wood | Vegetable beds, rustic borders, informal gardens | Warm, affordable, easy to cut | Can rot over time |
Stone | Cottage gardens, front beds, sloped areas | Long-lasting and substantial | Heavy and slower to install |
Metal | Modern gardens, lawns, gravel paths | Clean lines and low profile | Needs careful alignment |
How to choose the right edging style for your garden
Choosing edging is partly practical and partly visual. A border that looks beautiful in one garden can feel out of place in another. Before buying materials, look at the shape, purpose, and mood of the space.
Match the edge to the garden shape
Curved beds usually look best with flexible materials. Metal, short wood sections, brick-sized stone, and smaller rocks can follow curves smoothly. Large straight timbers or long stone slabs can fight the shape and create awkward gaps.
Straight beds can handle stronger lines. Metal strips, square-cut stone, and timber boards all suit formal layouts. If the house has clean architecture, a straight edge can connect the garden to the building.
For small yards, thinner edging often works better. Heavy stone or thick timber can make a compact garden feel crowded. Slim metal or a narrow wood edge can define the bed without taking up valuable planting space.
Match the material to the planting style
A cottage garden filled with peonies, phlox, daisies, and ornamental grasses often looks charming with stone or weathered wood. These materials suit abundant planting and softer outlines.
A modern garden with ornamental grasses, clipped shrubs, gravel, and simple plant groupings usually benefits from metal edging. The clean line supports the structured planting.
A vegetable garden needs function first. Wood is often the easiest edging for raised beds and growing areas. It gives clear access, holds soil well, and can be built to practical dimensions.
A woodland or shade garden usually looks best with natural stone, logs, or a simple trench edge. Materials that blend into the setting feel more at home under trees and around ferns, hostas, and native plants.
Think about maintenance before style
Some edging needs more attention than others. Wood may need checking for rot. Stone may need resetting if frost shifts it. Metal may need occasional re-anchoring if the soil moves.
Also think about mowing. If lawn meets the edging, the mower wheel needs a stable path. A low, flush edge can reduce trimming. A raised edge looks good but may require a string trimmer along the base.
The easiest edging to live with is the one that works with the way the garden is maintained, not against it.
Drainage matters too. In areas with heavy clay soil or spring thaw, install edging so water can move away from beds and paths. A solid barrier that traps water can create soggy soil.
How to install garden edging step by step
The installation process changes slightly by material, but the basic method stays the same. Good results come from careful layout, a stable trench, and patient levelling.
Step 1. Plan the line
Start by marking the edge. Use a garden hose for curves and string tied to stakes for straight lines. Step back and look from several angles, including windows, patios, paths, and the street.
Adjust the line until it feels balanced. Curves should be smooth and generous, not wobbly. Straight lines should relate to the house, fence, path, or driveway.
Once the shape is right, mark it with landscape spray paint, sand, or a shallow spade cut.
Step 2. Clear the work area
Remove grass, weeds, roots, stones, and loose debris along the marked line. Give yourself enough room to work on both sides of the edge.
If grass has spread into the bed, cut it out before installing the edging. Edging slows future growth, but it will not fix a bed already full of turf roots.
Step 3. Dig a trench
Dig a trench along the marked line. The depth depends on the material.
For most edging, the trench should be deep enough to bury part of the material below grade. This helps block grass roots and keeps the edge stable.
As a general guide:
Wood edging often needs a trench deep enough to hold the bottom firmly in place.
Stone edging needs room for a compacted base and partial burial.
Metal edging usually needs a narrow slit trench, with enough depth to secure the lower edge.
Keep the trench width consistent. Remove loose soil from the bottom so the base is firm.

Step 4. Add a stable base when needed
Stone edging should sit on a compacted base of gravel or coarse sand. This helps with drainage and reduces shifting. In areas with freezing winters, a better base can make a noticeable difference.
Wood may also benefit from a thin gravel layer underneath, especially in damp sites. It keeps the bottom from sitting directly in wet soil for long periods.
Metal edging usually does not need a wide base, but the soil around it should be firm enough to hold stakes.
Step 5. Set the edging in place
Set the edging material into the trench and work in small sections.
For wood, align boards or logs, check the height, and fasten corners or joints as needed. Use stakes on the inside of the bed where they are less visible.
For stone, place the largest and most stable pieces first. Fit smaller stones around them. Tap each stone gently into place with a rubber mallet. Check the top line often.
For metal, follow the manufacturer’s instructions for joining sections and adding stakes. Keep the strip smooth as it follows curves. For straight runs, use a string line to avoid drifting.
Step 6. Check the level and height
The top of the edging can sit flush with the lawn, slightly above it, or higher for a raised look.
A flush edge is easiest for mowing. A raised edge holds mulch well and creates a stronger visual line. For vegetable beds and raised borders, height is part of the design.
Use a level for straight formal edges. For natural stone, aim for visual balance rather than perfect precision.
Step 7. Backfill and compact the soil
Once the edging sits correctly, refill the trench on both sides. Press the soil firmly by hand or with a tamper. This step matters because loose backfill lets edging shift.
Add mulch or gravel after the edge is stable. Keep mulch slightly below the top of the edging so it does not spill over after rain.
Step 8. Water and inspect
Lightly water the area to settle the soil. Check for low spots, leaning sections, or gaps. Make small corrections right away, before plants and mulch hide the problem.
Over the next few weeks, watch for movement, especially after heavy rain or temperature swings. A quick adjustment early can prevent a bigger repair later.
Design ideas that make edging look intentional
Edging looks best when it connects to the rest of the garden. Rather than choosing a material in isolation, repeat colours, textures, or shapes already found in the space.
If the house has stone steps or a stone foundation, stone edging can make the garden feel tied to the architecture. If the deck or fence is cedar, wood edging may feel natural. If there are black window frames, railings, or planters, black metal edging can echo that detail.
Use curves with purpose. A broad curve around a lawn feels calm. A tight wiggle can look accidental and makes mowing harder. Keep curves simple, especially in front yards.
For a polished look, choose one main edging material and repeat it. Mixing materials can work, but it needs restraint. For example, metal edging around lawn beds and stone edging around a fire pit area can make sense because the zones have different uses.
Planting can soften hard edges. Let low-growing perennials, thyme, alyssum, or ornamental grasses spill slightly over stone or wood. Keep metal edging cleaner so its fine line stays visible.
Lighting can also make edging more attractive. Low path lights beside a stone edge can highlight texture at night. Solar markers can help define a vegetable garden path. Keep lighting subtle so the garden still feels natural.

Common mistakes to avoid
Most edging problems come from rushing the groundwork. A beautiful material will not perform well if the base is uneven or the trench is too shallow.
Avoid these common mistakes:
Skipping the layout stage
A border that looks fine up close may look crooked from the patio or sidewalk.
Installing edging too high
Raised edges can block mower wheels and create extra trimming work.
Forgetting about drainage
Solid edging can trap water if the bed is already low or poorly drained.
Using weak stakes
Edging needs to resist soil pressure, frost movement, and bumps from garden tools.
Letting grass remain under the edge
Grass roots can reappear quickly if they are buried instead of removed.
Mixing too many materials
Too many edge styles can make a garden feel busy instead of finished.
A simple, well-installed edge usually looks better than an elaborate one that does not suit the space.
A better edge can change the whole garden
Garden edging is a small project with a big visual payoff. It frames plants, controls creeping grass, keeps mulch in place, and makes regular maintenance easier. Wood brings warmth and practicality. Stone adds weight and a timeless feel. Metal creates crisp lines with a modern touch.
Start with one bed if the whole yard feels too large to tackle. Mark the shape, choose a material that suits the garden, and install it with care. Once the first edge is clean and settled, the rest of the garden often becomes easier to imagine.
A clear edge gives the garden a sense of intention. It turns loose planting into a designed space, and it makes every flower, shrub, and path look more at home.


Comments